Once I got into digital photography the number of pictures I took exponentially increased. But while capturing great photos became easier, viewing them remained a frustrating experience, limited to printing them out or having the whole family crowd around a desktop monitor.
So when digital picture frames hit the market a few years ago I was very excited. They looked just like a regular framed photo I’d hang on the wall, but with the key difference that they could flip between many different images — sort of a massive photo album on the wall. Then I read the fine print. In order to use this particular product I would need to shell out a monthly service fee to host my pictures on some Internet server that I would then configure the digital picture frame to dial in over a phone connection. This would be like paying someone lots of money to read you the daily newspaper in Morse code. I decided to wait until digital picture frames came out with broadband access to my home network.
While I was waiting, I came across a blog posting about a do-it-yourself solution and my world changed.
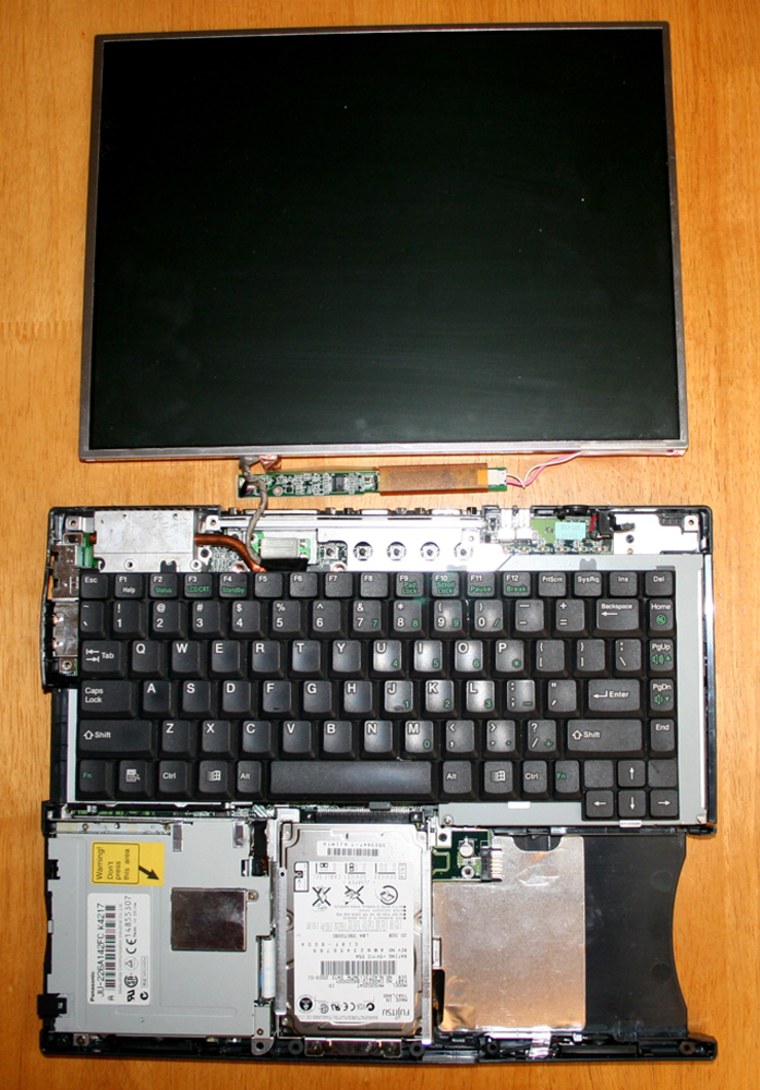
Some enterprising developer had taken apart a laptop, crammed it into a shadow box and set it to boot Windows CE off of a CD. Pictures could be uploaded via a flash or USB drive and a mat board created a nice-looking frame around the laptop’s LCD screen. This guy was definitely on to something.
Finding a laptop to rip apart was easy; we have a handful of them in the house that have been decommissioned to closet space. My first victim was to be a Toshiba Tecra 8100. The screen was damaged so I ordered another one off of eBay, where I noted that I could pick up many more laptops for cheap for future generations of do-it-yourself digital picture frames.
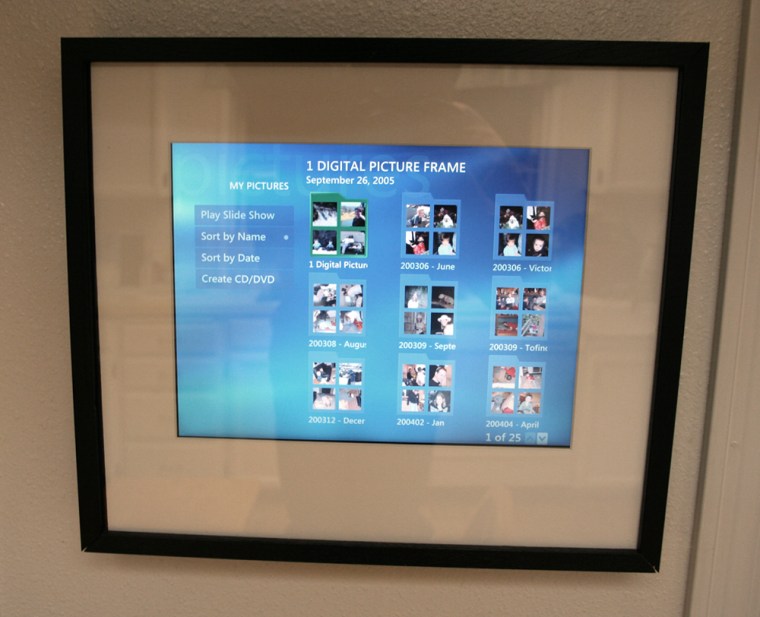
While I liked the picture frame the blog described, I wanted more functionality. I decided to use Windows XP Media Center Edition in order to have a rich interface to the music and photos I planned to access through my homegrown device. Furthermore, I wanted to hang the frame in the kitchen so I didn’t want mice and keyboards required to upload or navigate content. Thus, I obtained a wireless network card so the digital picture frame could be remotely managed through Windows Remote Desktop off one of the other computers in my house. But since I didn’t want to have to use one of those computers simply to navigate the content, I threw in a Media Center Edition-compatible remote to the mix.
The destruction begins
I was surprised to find that tearing apart the laptop and configuring all of the peripherals was the easy part. The hard part was getting the picture frame borders perfect. After trying to do the cutting myself a few times, I decided to pay a few extra bucks to get some help from the local picture frame store. They did a great job and I’ll start with them on the next digital picture frame I build.
Here’s a rough outline of how I did it. (Note: If you’ve never taken apart a computer before, this may not be the project to start with. There’s lots of safety information available online and of course, doing any of this will kill your warranty.):

Step 2: Build yourself or have a frame shop build a shadow box to house the broken down laptop. It should be at least 2 to 3 inches deep with the other dimensions variable according to the size of your screen.
Keep in mind you want enough space for a 1 to 3 inch mat border around the screen. How big you make the mat is up to you, though the frame people will provide good advice. Consider having the bottom border be larger than the top by 10 to 20 percent. You will also want to choose a color for both the frame and the mat: I chose a basic black frame with a white border.
Lastly, you will also need to have a piece of glass cut to fit into the shadow box.
Step 3: Here’s the tricky part. You can’t just glue the LCD screen to the back of the mat border. You’ll need to somehow keep the LCD screen perfectly centered and held secure in the shadow box and have it magically centered in the mat border as well.
Buy some 1/4-inch foam core and cut it to fit perfectly inside the shadow box. Then cut out a hole in the center of the foam core that is the exact size of the perimeter of your LCD screen. You can now fit your LCD screen inside the foam core and secure it with duct tape on the front and back.
Place the whole thing into the shadow box along with the mat board. If you have had the help of the frame people then you should have perfect alignment. If you do it yourself, you may have to do this a few times before you get the measurements right.
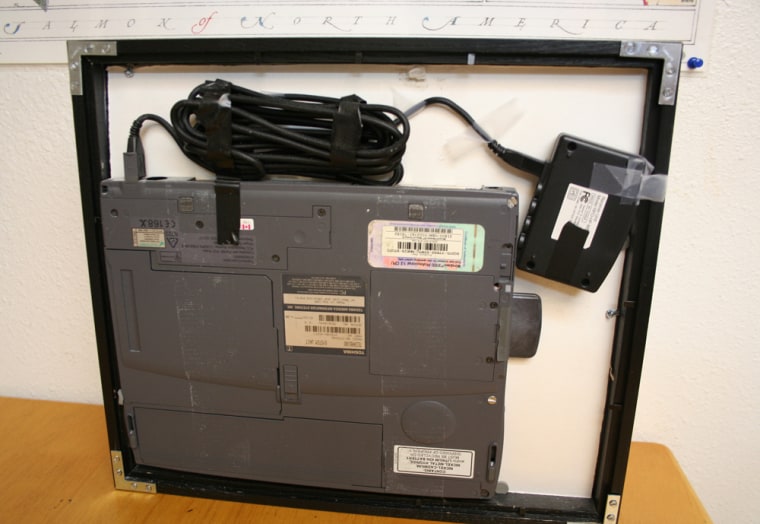
Step 4: The next layer is the computer. Find some thick cardboard or particleboard to mount the laptop to. Cut this board material to fit exactly inside the shadow box. Cut a small hole in this board material over the place where you need to run the LCD wire to the motherboard. Once you screw the laptop to this board material, you can then lay this layer on top of the back of the LCD monitor.

Secure this layer in place in some fashion and you are pretty much complete. Since I wanted to use the Media Center remote control, I also had to plug it into the laptop and tape it inside the frame (another reason for a large mat border.)
Step 5: Now it’s time to hang your digital picture frame. For the cleanest looking mounting, find a wall with a closet behind it so you can run power and speaker cable to the computer out of sight. I simply drilled a 3/4-inch hole in the wall behind the frame to run power and speaker cable.
The big kitchen debut
This first digital picture frame was a present to my wife. On Christmas morning she came down stairs to find a wrapped present stuck to the kitchen wall. The plan was to have her take off the wrapping and find picture of our family. I would then use the remote to flip to another picture when she wasn’t looking for a surprise effect.

Unfortunately, the computer had rebooted overnight and I had yet to work out the bugs of my auto-login and launch script. Thus, upon unwrapping the present on the wall she was presented with … a picture frame of the standard Windows desktop. Needless to say, she was at a loss for words.
I gathered up bits of my crushed ego and quickly got a picture up of the family and then gave her the remote. Within minutes, she had figured out how to look at the “Best Pictures” folder and select her favorite artists and albums to listen to. The wireless AR speakers I placed strategically on top of the refrigerator and bookshelf were an added bonus.
To my pleasant surprise, this digital addition to the kitchen was quickly adopted and used multiple times per day. I usually select a new picture in the morning before leaving for work and I return to find our favorite music playing in the kitchen. (I did play around with Internet widgets such as weather, recipes, calendars, e-mail, etc. But we found that we’d rather just use a regular computer and let the digital picture frame be about the pictures.)
Simply having access to our favorite photos has completely changed the kitchen experience and encourages us to continue capturing those family moments on our digital cameras. In fact, it gave me an excuse to go out and buy that Canon Rebel XT I was drooling over.
The tweaking continues: Beaming 8MB files over the wireless network as I added new photos was slowing down the slideshow performance so I eliminated this bottleneck by adding SyncToy, an insanely easy-to-configure application available on Microsoft.com’s XP downloads page. SyncToy will keep two folders located anywhere on your network automatically synched according to your preferred schedule.
Of course, commercial digital picture frames have since come a long way. The Internet options remain, but others now let you load images with a media card or yes, even over your wireless network. But I’m pretty happy with my self-made version, and the customization it allows. Now, maybe I need one for the office …
Travis McElfresh is the director of technology for MSNBC.com.
